


How To Create A Custom Chatbot For eLearning
Chatbots are one basic way to use AI to automatically answer frequently asked questions (FAQs). The idea behind this project is to use a chatbot as a learning resource in a learning activity or as a performance support tool at work.
You can follow the steps in this article to create your own Skype chatbot for eLearning purposes. There are 4 parts to developing this, and they are:
- Skype free account used as the chat channel
- QnAMaker free account used as the knowledge base for the chatbot
- BotFramework free account to create the chatbot
- eLearning authoring tool or website to embed the chat in
eLearning Bot Sample
I always like to start tutorials with a sample of the finished work, so click on the image below to check it out. You will also see a video showing you the creative process with Microsoft's QnA Maker.
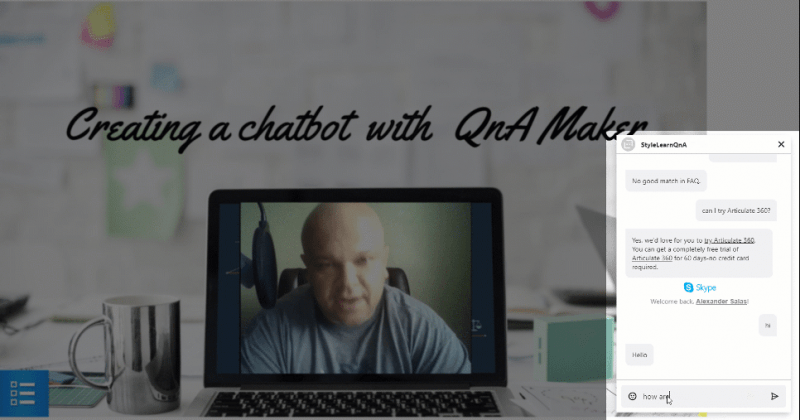
Credit: Alexander Salas
1. Create Skype And QnA Accounts
Go ahead and create your free Skype and QnAMaker acccounts first.
2. Create New Knowledge Base
QnAMaker is a Microsoft service that will create our knowledge base for the chatbot to use. This service is very practical because all you have to do is provide it with the knowledge it needs. It will then apply the AI necessary to scrub websites or documents you provide to find the answers.
In QnAMaker, click on Create new service and give your bot a name i.e. eLearning chat, etc.
You can then proceed to add any URL to a webpage that has FAQs. If you have no website, just create a word document with a series of questions and answers, i.e.
What's a bicycle?
A vehicle with two wheels.
If you get confused, my video in the eLearning sample also shows you what the word document looks like.

3. Verify Your Knowledge Base Data
After you click the Create button, your QnAMaker knowledge base is created and it will look like the image below. At this point, just ensure your questions and answers are properly paired. Click Add New Pair if you want to add new questions and answers, but don't forget to click on Save and retrain.

4. Test Your Knowledge Base Responses
After you are happy with the way things look with your Qs and As, you want to click on Test and the system will show you a chat simulator where you can type questions to test if it's providing the correct answers. This is called the "training" phase in AI; you can provide feedback to the system on whether is providing correct responses. This information helps the system "learn" from your input.

5. Get Your Knowledgebase IDs
At this point and if everything is working as expected, the last step would be to click Publish and the system will give you a unique identifier and subscription key (think of it like a username and password) for your knowledge base. This is very important info you would need to connect your knowledge base with the actual chatbot that we will build using BotFramework. So, take note of the knowledge base ID and subscription key as you will need them a bit later.
"POST /knowledgebases/[knowledgebaseid is located here]/
generateAnswer
Host: https://westus.api.cognitive.microsoft.com/qnamaker/v2.0
Ocp-Apim-Subscription-Key: [Subscription key code is here]
Content-Type: application/json
{"question":"hi"}"
6. Create A Chatbot With BotFramework
Great job thus far; now we need to create our chatbot, so it can read our knowledgebase.
Please follow these instructions to create your bot. The most important part is to select the Questions And Answers bot template. Pay close attention to the image below.

7. Connect Chatbot To Knowledgebase
At the time this article was written, Microsoft is planning to migrate all BotFramework services and host them through their Azure Portal. So, it may feel that in this process you would have two separate accounts, but it's all consolidated under your Microsoft account. In your Azure portal, open your bot app, and copy/paste the ID and Key from Step 5 in the QnAknowledgebaseID and QnASubscriptionKey fields as seen below.

8. Add A Skype Channel To Chatbot
Hey! This is pretty much the last step of the setup! So far, we have a knowledge base and a chatbot, but nowhere to deploy so users can engage them. This is where Skype comes in as an add-on to the bot inside your Azure portal. In your bot settings, find Bot Management>Channels. Then, click on the Skype button and add it as a channel for the bot.

9. Find And Copy Your Chatbot ID
The chatbot ID can be found in Bot Management>Application Settings>MicrosoftAppId
Please make sure to copy this ID as you will need it for Step 10.
10. Embed Your Skype Chatbot In eLearning
For this last step, you can use the code shared here or customize from the Skype for Developers site.
The final touch is to place the following lines of code within the <body></body> tags of any web page i.e. story_html5.html if you are using Articulate Storyline
<div class="skype-button bubble" data-bot-id="This is the Chatbot ID from Step Nine"></div>
<script src="https://swc.cdn.skype.com/sdk/v1/sdk.min.js"></script>
Wrap Up
In summary, using chatbots in eLearning can be a refreshing addition to learning activities, and the method shown here does not require any programming knowledge. Creating your own chatbot can be a helpful exercise to become more acquainted with AI and how it can empower your training strategies as a learning professional.