
There’s Gotta Be a Better Way
After working in close proximity with instructional designers for a short time at Utah State University, Kenneth Larsen (current ITLS grad student at USU) identified a major design challenge facing his team. Instructional designers are often faced with the time-consuming task of creating new online courses in Canvas, module by module, page by page and assignment by assignment. Kenneth pointed out to the team at the Center for Innovative Design and Instruction (CIDI) that, “there’s gotta be a better way” to tackle this challenge. Thus spawned the integration of Kennethware, known more formally as USU Tools.
5 Keys to Create the Course Shell
The CIDI team implemented these open source tools by utilizing a “template wizard” and other supplementary custom tools to quickly build out course shells. ID’s meet with instructors to create a course map, and based on an individualized needs analysis for the new course, the shell can be created in Canvas using 5 custom integrations.
- Create a Template Page
Launch the USU Template Wizard, and select “Wiki Page Templates”. This page will become the summary page for each unit or module. Using the USU Tools, choose from one of the predefined themes, and add boilerplate sections or create your own. All sections, headers, icons and content areas can be edited, reordered and customized. View the step by step instructional video In order to watch this video you need to have advertising cookies enabled.You can adjust your cookie preferences here.
 - Customize Modules
Launch the USU Template Wizard, and select “Modules”. In the dashboard that opens setup a pattern for the modules to follow. This will include the total number of modules and naming conventions. Then click “Add Modules to Course” and customize each module title and the specific number of assignments/quizzes/discussions for each module. Then click “Add Module to Course” at the bottom to implement your settings. The API will then create your customized modules into your course. View the step by step instructional video
In order to watch this video you need to have advertising cookies enabled.You can adjust your cookie preferences here. - Use Custom Tools
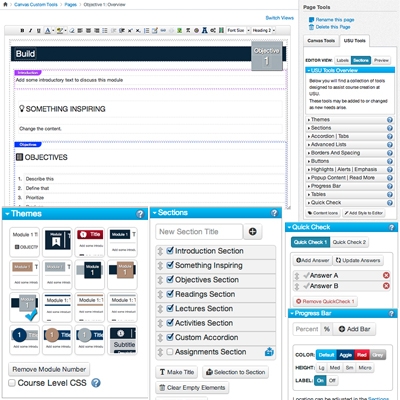
Now that the course modules have been created you can use the custom tools to edit the sections. Create objectives using Bloom’s Revised, change list types, change icons, add accordions or modals, insert quick checks, and more.View screenshots of the UI panels: https://usu.instructure.com/courses/305202/wiki/the-interface View a page with sample features included: https://usu.instructure.com/courses/305202/wiki/examples View the step by step instructional video
In order to watch this video you need to have advertising cookies enabled.You can adjust your cookie preferences here. - Customize Front Page
Launch USU Tools, and choose a front page theme. Then customize your theme by adding course code and title, add boilerplate sections and changing list options and icons. You can also customize the banner image by clicking “Add Custom Banner” and select “Front Page Banner Image”. Click “Choose Image” and select a high resolution image from your computer. Next, identify the fixed ratio crop area, and click “Add Image” and save your changes. You can also add a dynamic list of modules on the front page of your course. View the step by step instructional video
In order to watch this video you need to have advertising cookies enabled.You can adjust your cookie preferences here. - Syllabus Tools
Navigate to the course syllabus and launch USU Tools. Similar to the editing functions of the wiki pages you can add boilerplate sections, or add your own custom sections. You can also setup your grading scheme in the course and import it into the syllabus. At USU we can also add or remove university policies and procedures automatically by selecting or deselecting a box at the bottom of the syllabus. View the step by step instructional video
In order to watch this video you need to have advertising cookies enabled.You can adjust your cookie preferences here.
By using the template wizard and the USU custom tools developed by Kenneth, the team at CIDI has made rapid course development in Canvas a reality.