

How To Create Custom xAPI Statements For Storyline
In the following videos, I will show you how to create custom xAPI statements for Storyline, that is how to send data from Storyline triggers to your LRS. There are many different ways that this can be done and this is just one example. These tutorials are the second in a series of executing xAPI tutorials. See the first tutorial.
The videos show a project called the Espresso Matchmaker.
- The Espresso Matchmaker was created in Storyline 2.
- The output is HTML5.
- The drink images at the end are taken from Freepik.com.
- The LRS used to record statements is Wax LRS.
The Storyline project sends data to the LRS when you click on a hotspot so if you choose a hot drink it will tell the LRS you responded with choosing a hot drink, if you select you want a sweet drink it will report you want a sweet drink, and if you select only a little it will report you only want a little. When you get to the end of the project and your drink is revealed a statement will be sent to the LRS on a trigger of “when timeline starts” stating that you completed the Espresso Matchmaker with a specific drink. There is a trigger on the retry button, so that when you select the Retry button another statement will be sent to the LRS stating that you launched the Espresso Matchmaker again.
The project allows me to follow a user to see whether they complete a whole path or if they drop off (when and where.) I can also see if they have replayed the project in one sitting.
A special thanks to Megan Roers for getting me into xAPI to help bring these tutorials to you.

Check out the project here to start sending statements and find out what drink you will get.
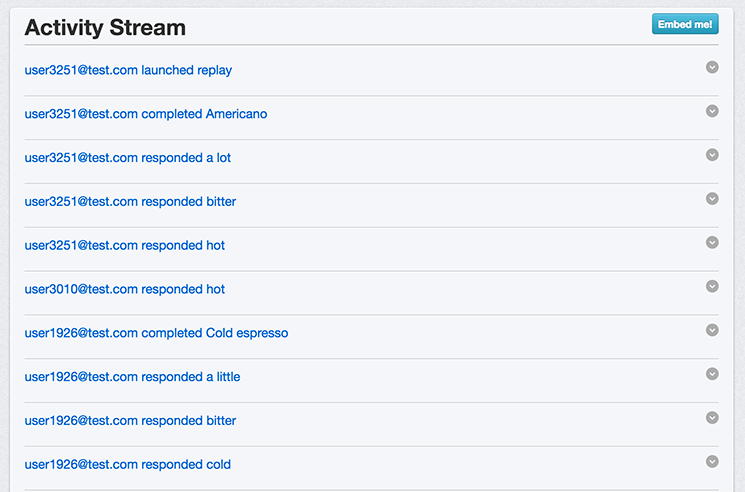
An example of what the statements look like.
What Are The Benefits?
Most likely you don’t have a need for tracking what kind of drink a user wants, however similar interactions can be used on other projects. Think about the data that will be most useful for you in your project. Do you want to know how users are interacting with your navigation? Do you want to see what paths they go down in a software sim? Do you want to see where their interest lies the most? Then investigate your findings and tie them to learning application and business outcomes. Here are some ideas on things you can track in Storyline for starters:
- Track paths users go down in simulations to see how they are using a tool.
- See if your users are interacting with added resources e.g. document downloads and pop-ups.
- Get feedback about your course/tool you created in Storyline right in the project by adding feedback buttons with xAPI JavaScript triggers on them.
- If your project is exploratory find out what most interests your users (what they go to most in the project) so that you can identify if there is a need there.
Pre-Requisites
It’s suggested you familiarize yourself with building launch URLs and encoding via Base 64. Check out my first article and videos on Getting Started With Storyline And xAPI.
Resources Needed For These Tutorials
- A free account of Wax LRS (or another LRS you are comfortable with).
- Storyline.
- An Amazon S3 or somewhere to host your course.
- A text editor (such as MS Word or Notes) or code editor (such as Atom or Sublime Text).
- Encode to Base64 format.
- Attention to detail.
Downloads For These Tutorials
Videos On Creating Custom xAPI Statements For Storyline
If you need an LRS to test out with try WaxLRS for free and get up to 2,000 statements a month. See how here.
Want to host your project? Check out how to do it on an S3 like I did.
1. Creating Execute JavaScript Triggers In Storyline With Your Statement Details And Publishing Your File (Duration ~2 Minutes)

Use the following script for editing: javascript:xapistatement('responded','http://espressomatchmaker.com’,'name','via storyline')
2. Editing The xAPI.js File (This Can Be Found In Downloads Above) (Duration ~2 Minutes)
Need to know how to encode to get your basic auth? Watch here until 1:58s.
3. Editing The Launcher.html File (This Can Be Found In Downloads Above) By Attaching Your xAPI.js Doc, Attach Your xAPI.js Doc To Your Storyline Output, And Test Out Your Project (Duration ~1 Minute)