


The Tools And Techniques Of Interactive Yes/No Stories
Once upon a rainy Sunday, after two hours of extensive R (Data Science course), I needed a break. Two things were about to happen at that time: the eLearning Guild's DevLearn conference and an Articulate eLearning Heroes challenge. This article reveals the secrets of building a Yes/No story-based branching challenge using Articulate Storyline. I will explain both the storytelling and branch design decisions as well as some of the technical implementation parts in Storyline.
This Is The Story Of "Out Of The Blue"
Every good story has a beginning, a middle, and an end. Every great story is about problem-solving. How the problem is laid out, who's solving the problem, what obstacles our hero or heroine needs to face to reach the outcome varies.
The opening page sets the setting, theme, and genre. Just by looking at the screen and reading about the Flemmings, you have an idea of the problem, where it takes place, who the main character is, and what the goal is. You also get a sense that this story will have a somewhat funny tone, and maybe a play on words?

Spoiler alert! Just like in the game, you need to make a decision right now. You can continue and read about the secrets of how it was made or experience the interactive story first. If you want to be surprised, take the challenge now.
How Is It Made?
There are two parts to this story: the Storyline framework and the scenario logic. Let’s start with Storyline first, and then we will explore the branching storytelling design. The Storyline course has four slides only.

An intro slide sets up the story of the Flemmings. The game slide is where you spend all your time making your choices. And finally, the success and failure slides are the two potential outcome slides.
The Game Slide
The core loop of the activity (scenario–choice–consequences) is happening on the game slide. It’s using a couple of tricks to make it engaging and effective. The core loop includes the same series of actions:
- Telling the story through a scenario
- Posing a question to the user
- Showing the consequences of the choice
- Adjusting lives, health, and distance left
- Repeat from 1
The story itself has many hidden references related to music. Some you will recognize, others you never will. Since the story has extensive branching, you may need to play it through a couple of times to see the story unfold. However, feedback is the heart of any game. In this example, your actions have consequences that are shown through 3 variables:
- Flemmings alive: you want to keep this number high
- Energy: you need this to move on
- Distance left: you want to this to be zero

Visual Feedback: Moving The Blue Mountain
The blue mountain in the background is actually a slider. The thumb of the slider is the image of the mountain itself. As your Flemmings get closer and closer to their destination, the slider reflects that and moves closer and closer to the right. Basically, the variable of distance left controls the slider. The smaller the variable, the more the slider moves to the right. A giant hotspot above the slider makes sure that the user can’t drag the slider anywhere.
Multiple Scenarios On One Slide
The scenario is a variable that shows the current scenario text where the user should make a decision. It is a variable to make sure we can dynamically show the correct scenario as the user can go through the story in various branching ways.
You may have noticed that with every decision, the number of Flemmings can change, their energy can go up or down, and the distance (measured in pixies) can increase or decrease. These are variables as well, of course. The visual change is not happening in a flash. You can see the update delayed digit by digit. This is done using JavaScript and it keeps updating the number every half a second or so until we reach the new amount. This effect, along with the feedback, provides a more engaging core loop than just changing the numbers suddenly.
Jumping Flemming
Our Flemming friend is jumping up and down, waiting to be saved in the middle. This is an old trick, but you may not have seen it before
How To Create A Continuous Loop In Storyline
This is done by using two motion paths. One that goes up and one that goes down. You start the up when the slide starts; that takes care of the first move. The down move is triggered when the up animation ends; that brings it back down again. And lastly, up is triggered when down is finished. And these three triggers are in a loop forever. (You can use that for adding an arrow to your screen pointing out something, for example.)
Additionally, our friend also moves his eyes (actually, only one of them). This is done by having two states. The states change depending on the up or down animation that has finished.
Note: These elements are included to help build more empathy toward the poor Flemmings. When you design a learning interaction, focus on elements that directly support your learning and performance goals. You may not need animated pieces at all.
Game Logic
When playing the game, the storyline may seem like a simple, linear story. This is not the case at all.
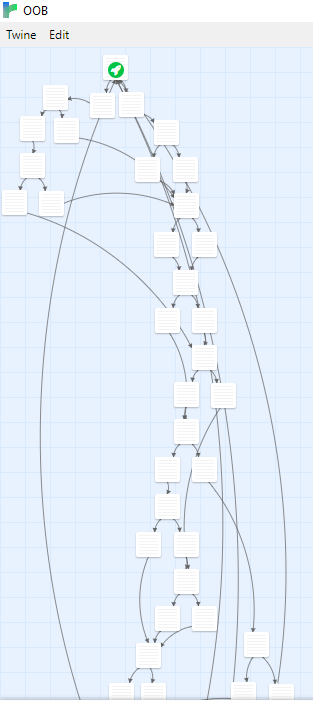
… and it didn’t even fit in one screenshot.
Designing Branching
I used Twine to create a branching story. Twine is an interactive tool, one of the best free tools out there to build branching scenarios. This story includes various tricks in “branch design.” True branching (where every decision takes you to a new branch) can get complicated fast: imagine 10 decision points with 2 choices = 210 = 2 x 2 x 2 x 2 x2 x 2 x 2 x 2 x 2 x 2.
Instead, you can build branching scenarios where the user ends up at the same point through different routes. There’s a whole bunch of ways to design branching for games. Check this out!
The story not only has branching but it also remembers some of your choices, which later may alter your options. Just like in real life, if you pick up 20 bricks, they make you walk slower and you'll use more energy to walk the same distance.
In my design, a scenario is followed by a yes or no choice with impact. Each of these choices may have different impacts on lives, energy, and distance left variables. I used Twine to run through the story itself, but the implementation was done in JavaScript (we’ll get there later).
Randomized Element
To increase "replayability" (ability to play it over and over again without repeating the same pattern), I added one randomized element. The bricks are randomly placed somewhere in the story. Randomization makes games unpredictable. Too much randomization can cause frustration because the players may feel everything is out of their control. Not enough randomization can make the gameplay too predictable and easy to win.
Game Logic Implementation
Twine is not only a good tool for creating your branching scenarios but also for testing. This free tool has all the options you need to create a quick prototype (including variables). After the story was created and tested in Twine, I put it to practice in JavaScript. JavaScript is the engine behind keeping track of the scenarios, where you’re going, and the impact you make with your choices. It also throws the random bricks into the story at the beginning.
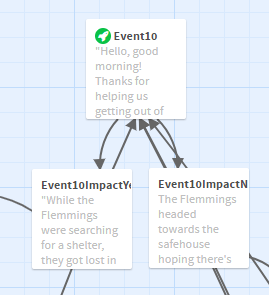
Each event has an ID (10 in this case), a description that shows up in Storyline in the scenario variable, and two branch IDs that determine where the user is going depending on a yes or no choice.
The other two elements are the impacts: 10y for yes and 10n for no. The impact event includes the narrative and relative changes to the lives, energy, and distance left.
By building the content this way, the actual logic that handles the game does not need to change. It does not care what scenario you’re doing or what narrative you're using. The structure is the same for every round. If you need to change the story, you can just change the scenarios and where they branch without changing the code that handles it. Separating the code, drives, logic, and content is always a good idea.
Lessons Learned
This was a quick design and implementation with some shortcuts. First, I tried to design the branching in Storyline using lots of variables that store scenario and impact. I got lost quickly. While you can do something like that in Storyline, it is much more flexible to do it in Twine (or some similar tool) in order to be able to build and test your branching.
The story itself currently resides with JavaScript in an array. Ideally, it would be in a separate file in XML or JSON. That way you completely separate the code logic and the content. It is better for translation or choosing stories on the fly, for example.
The calibration of impacts takes a long time. Lots of playtesting. You want to design a good balance between challenges and dead ends. What you're after is a fine line between being challenged and frustrated. I had people playtest the prototype in iterations. Finally, I had to tweak the bricks a couple of times to make sure that there was not only one way to make it to the end. Introducing randomness into a game makes it more engaging and replayable. And as I mentioned, too much randomness can make the game unpredictable.