
Learn How To Effectively Use And Implement The ADDIE Instructional Design Model
For instance, you can export a PPT file into a motive GIF file with a specific interval of seconds. You can give an online presentation by sharing the link with your audience. Or you can record your presentation as a video and publish it on YouTube. You can also convert a PPT file into a PDF file and then into an audio file. For non-native English speakers, this approach can save time and reduce costs regarding the vocal narration of video lectures. In other words, if you only know how to use PPT, you can start teaching online! But this article does not stop with PPT, it also guides you on how to adopt the ADDIE Instructional Design model and use the 5 stages to implement eLearning. I intend to share some personal experiences about teaching online to instructors worldwide who are new to eLearning.
Purpose Of Education
All learning falls into three categories: knowledge, skill, and attitude. It means that all teachings—either online, offline, or blended—should strive to improve the knowledge, skills, and attitudes of students. A teacher should consider educational aims and the learning outcomes (preferably measurable) when designing a course.
Try to answer the following questions:
- How many units are you breaking the course into?
- Do you have working titles (topic titles) for each unit?
- What are the learning objectives you set for each unit?
- What measurable outcomes are expected from each unit?
- What educational resources are you putting into each unit?
- What educational activities are you arranging for teacher-student interaction, student-student interaction, or student-TA interaction?
- How do you measure a student’s learning outcomes for each unit?
- What assessments do you have in each unit?
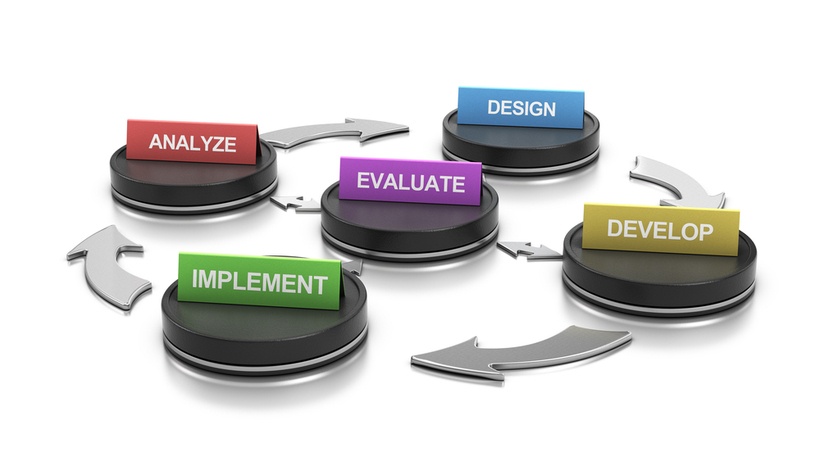
ADDIE Instructional Design Model
What you have been through above is part of the Instructional Design experience. One of the most famous Instructional Design models is the ADDIE model. It consists of 5 stages:
- Analyze
- Design
- Develop
- Implement
- Evaluate
Each stage has a deliverable that feeds into the next stage and includes opportunities to gather feedback that informs training development. Let's go through these 5 stages below.
1. Analyze
There are different types of eLearning courses, with some being information-based and some being performance-based. As the subject expert, you have to consider choosing online solutions based on the content being delivered. For instance, if you are teaching programming, you need to involve programming practices to constantly provide feedback on students’ exercises. If you are teaching statistics, you may need to demonstrate how-to operations/calculations by screen sharing, whiteboard writing, or using pre-recorded video tutorials.
Other things that you should pay attention to during this stage are:
- Identifying the problem you are trying to solve
- Understanding your online students (often pre-course questionnaire)
- Determining your educational objectives, goals, and desired outcomes from the course
- Considering and planning the logistics (e.g., the timeline of the course, budget, delivery method, location, platform, tools, staff, etc.)
What media will you use to deliver the knowledge? In the traditional way, it can be textbooks, handouts, PPT on the screen, etc. In the environment of eLearning, we have to distinguish the two following types of learning objects.
- Resources: passively delivering knowledge to students without offering feedback (e.g., recorded videos, recorded audios, PPTs, PDFs, books, images, animations, and other documents)
- Activities: actively offering feedback and engaging students (e.g., assessments, formative assessments, summative assessments, online discussions, group work, online conferencing, online chatrooms)
In general, a successful eLearning experience is often a blend of different types of resources and activities.
2.Design
In this stage, we build content—the flesh and bones of your course. There are 2 basic levels that you need to consider when designing a course. Use the following structure as a reference.
1. Course-level properties:
- Title of the course
- Purpose of the course
- Structure of the course
- Learning outcomes of the course
- Student support channels
- Assessment activities and weights
2. Unit-level properties:
- Title of the unit
- Purpose of the unit
- Structure of the unit
- Learning outcomes of the unit
- Educational resources allocated
- Educational activities allocated
- Formative assessment in the unit and weight
Let’s Structure Content Now
What learning objects and sequences are you using? Building from scratch can be a tedious job. So, consider using eLearning templates. Templates always help to quickly draft eLearning for your students. A lot of eLearning templates are based on the tools that they were developed with, such as Articulate, Adobe Captivate, Lectora, etc. And you have to understand how to use this software in order to purchase these templates from different sources, such as eLearning Bros, FasterCourse or Rapid eLearning templates.
eLearning Toolkit
Any creative work needs suitable tools. eLearning development needs a toolkit.
- Multimedia design tools
No matter where online you are delivering content, you have to present using some type of multimedia. To create photos, you could use software such as Photoshop, Canva, or a pen and paper/phone camera. To produce videos, you need a video recorder from your smartphone or camera or screen recording/capturing software. To edit videos, you can use Camtasia, Videomaker, iMovie, etc. To edit audio, you can use software like Audacity. - Video conferencing tools
Many schools now use Zoom to offer live classes and share archived video recordings for students to review. Other similar tools include DingTalk, YouTube Live, or Facebook Live. - Whiteboard tools
Tools such as AWW app, Web Whiteboard, and Ziteboard allow drawing and writing together online to take place. - Online forum tools
If you are interested in creating a forum to organize online discussions in the class, you can choose some free forum hosting services on the internet such as ProBoards or Zetaboards. - Converting tools
Another tool that may be handy is a format converting tool, such as Otter, which converts audio into text. Use Zamzar to convert literally anything to anything. I used Zamzar to convert an 11-page journal article into a 1hr and 40 min. audio file in just two minutes. It is one way to make your text content listenable, especially to people who cannot see or read. - Big file transfer
If you want to directly share a large stand-alone course as a file to your online audience, you can use online drives such as Google Drive, One Drive, or Wetransfer.
All the examples of tools above are to demonstrate the diversity of tools that can be useful to an eLearning teacher who needs to develop and distribute their own teaching online.
View The Internet As A Gigantic Reservoir
Often we can use existing resources in our own courses. The internet is a gigantic power bank you can use to charge your course in order to boost its richness and diversity. Look for content that is open-sourced and under a CC license to use in your course. For instance, you can look for images on websites such as Pixabay, Unsplash, Pexels, Freeimages; look for icons on websites such as Flaticon, Icons8, Iconfinder, Freeicons; look for videos on YouTube or Vimeo; look for textbooks on b-ok.cc or gutenberg.org; or look for scholarly articles on sci-hub.ren.
3. Develop
Let’s talk about containers now. Where will you publish your eLearning content?
Platforms To Host Your eLearning
If your organization already has course management systems, like Blackboard, Moodle, etc., you will just need to consult with the technical team for support and follow the organizational arrangement. What you need in this case is to deliver what the organization wants. If you want to do more, consider visiting documentation of the corresponding platforms for more guidance. If your organization didn’t help much in facilitating the transformation, then I have some advice for you below.
Set Up Your Own Course Management System
If you are familiar with domain hosting and how to install an online app on a hosting server and link the installed app to a specific domain, you can easily set up a Moodle-based course management system. It can offer what you need for your class all in one place.
Another choice is using WordPress. Unlike Moodle, WordPress is a tool used to build apps, blogs, or static websites. But it can be heavily enhanced by installing additional plugins, which can instantly transform a blog into an online class.
Use External Course Management Systems
There are also some online course hosting sites that allow instructors to publish their courses, such as Udemy, Easyclass, Rcampus, and P2PU.
Use Standalone Features
If you do not want to deal with all the above-mentioned platforms that integrate many features in one place, you can also deliver simplified eLearning by only using standalone features. For example, you can create a PPT and use the “Present online” free feature built in the PPT app. It will generate a web link that your students can open in their browser and use to watch the presentation when you play the slides synchronously. To communicate this kind of flow, you can email your students in advance explaining the steps to follow in your teaching.
Place Your Designed Content In The Container
To summarize, this step is used to put all the content developed from the previous step into the container that you have chosen. You have to make sure to test the whole flow before moving on to the next step. It will be stressful to see a broken link or have a malfunction in your presentation when delivering your class online.
4. Implement
This step is to "officially" teach your students online. Important notes include:
- Use regular notifications to remind your students
- Ensure there is interaction going on in the online class (check the interaction dynamics as follows in the figure)
- Ensure there is someone (yourself or teaching assistant) to monitor the interactions and provide feedback
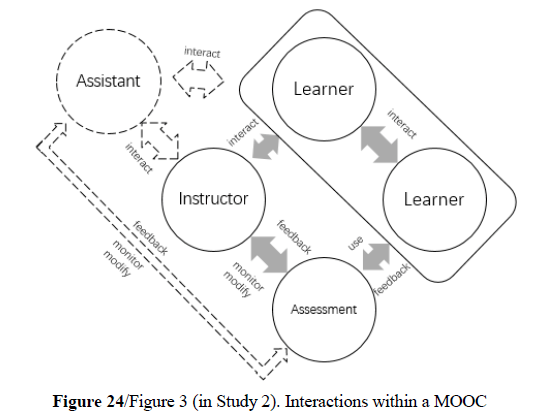

(Source: Lin, 2018)
5. Evaluate
This step allows you to reflect on the whole experience, collect data (pre-course questionnaire and post-course questionnaire), and students’ performance results in different assessment activities, etc. You can look at all these qualitative and quantitative course results and think about how to improve them in the next iteration.
Conclusion
This article shares my personal experience of designing eLearning for online learners using the ADDIE Instructional Design model. It shows the 5 steps of the eLearning design and development process, along with different tools that can be useful for eLearning instructors. I hope this article can help teachers who are in search of "how to prepare to teach online."
References:
- Lin, J. (2018). Exploring the experiences of instructors teaching massive open online courses in tourism and hospitality: A mixed-methods approach. Doctoral thesis, Università della Svizzera italiana. https://doc.rero.ch/record/306564