

A Step-By-Step Process For Installing Moodle On Windows And Mac
It should be noted that Windows is not the recommended platform for large Moodle LMS installations, as it does not have the storage capacity to hold the data from your Moodle site. If you plan to hold more than 2 billion records in your Moodle databases, we recommend considering an operating system with 64-bit support.
The Complete User Guide To Moodle Chapter 2
The following steps for installing Moodle are intended for skilled IT professionals. If you do not have technical skills or Moodle experience in-house, we recommend reaching out to a Moodle Partner to have your Moodle site implemented for you.
How To Install Moodle – Windows
1. Plan System Capacity
Before getting started with your Moodle LMS installation, you will first need to know which hardware is going to best support your users and data. Managed Moodle Cloud Hosting is the recommended option as it will support any amount of users and will ensure your Moodle site doesn’t crash if you exceed your capacity.
2. Install Database Server
Now that you know your capacity, it is time to install your database server. The three databases recommended by Moodle are MySQL, MariaDB, or PostgreSQL. Please not if you plan to use Microsoft SQL Server 2005 or Oracle, this is not recommended due to system incompatibilities.
3. Install Web Server
There are also a few different options for installing your web server, which is the next step in your Moodle LMS installation. Apache 2 is the recommended web server to use with Moodle because it has been tested and verified. IIS 7/8 has also been used in the past but has not been tested for the same reliability as Apache 2.
4. Install PHP
When installing your PHP chosen operating system, be sure to follow best-practices. If using a IIS ⅞ server, use Microsoft’s Web Platform installer.
5. Download Moodle And Copy Files Into Place
Download and copy the Moodle files from download.moodle.org. There are a number of different places you can obtain Moodle’s open source code from. It is highly suggested that you download the standard version from Moodle as your site will be better supported for security and bug fixes from a trusted Moodle Partner. Once downloaded, a directory called “Moodle” will appear which contains a number of files and folders. If you want your Moodle site to be located at yourwebserver.com/moodle, place the entire folder in your web server’s documents directory. If you want your moodle site to be located at yourwebserver.com, you can copy all content straight into the main web server documents directory.
6. Create Moodle Data Directory And Secure Database
You will need to create a data directory to store all of our Moodle files (this includes uploads, cache, session data, even temporary data). Once you have created a Moodle data directory, you will want to take appropriate measures to secure this data. To begin, ensure that your directory is NOT accessible directly via the web. If you are hosting Moodle internally, create an empty database for the installation. If you are outsourcing hosting, find a web-based administration page for databases as part of the control pane. It is recommended that you outsource your hosting to a specialized Moodle hosting vendor.
7. Begin Moodle Install
Run the installer to create Moodle database tables so you can configure your new site!
8. Setup Backups
There are countless errors that may cause your Moodle site to crash resulting in the loss of courses, student data, and history. Ensuring that a proper backup and disaster recovery system is in place will be the difference between business failure or business continuity. It is important that Moodle courses are backed up in addition to your Moodle data, Moodle directories and your Moodle site configuration. Backups should be performed hourly and stored in multiple geographic locations in the case of a natural disaster. With Managed Moodle Cloud Hosting, this is all taken care of for you wherein backups and disaster recovery are performed and monitored to international standards.
9. Checking Server Security And Performance
There are many factors to consider to ensure your Moodle site runs with optimal performance and to regulatory security standards. A poorly performing Moodle site results in slow loading pages, lagging video, system crashes, and security/vulnerability threats. In order to accurately check server security and performance you will want to gather benchmark data from performance monitoring sites. Once you have a performance benchmark, you can accurately measure how well your Moodle site is running. Examples of performance metrics you will want to compare are: scalability, server clusters, hardware configuration, operating system speed, web server performance, PHP performance and database performance.
When outsourcing your Moodle Implementation and Cloud Hosting, all of this is taken care of for you, at a fraction of the cost (and time) that would be required to do in-house. In addition, you benefit from the expertise and knowledge of people who have been working with Moodle since its conception in 2002.
How To Install Moodle – Mac
Before getting started with your Moodle installation for Mac ensure that your computer meets the following system requirements:
- Apple OS X Computer
- Processor: Intel x86_64 (i5, i7, Xeon, Core2Duo)
- Ram: 4 GB or higher
- Hard disk: At least 1 GB available
- System Software: OS X 10.6.8, 10.7, 10.8, 10.8, 10.10
1. First, download the disk image Moodle4Mac-MAMP.dmg from Moodle packages. Various file images will be displayed here, for the different Moodle versions - double click the disk image of the Moodle version you want to mount the installation disk. We recommend downloading the latest stable version to ensure your Moodle site is supported for the longest possible duration of time.
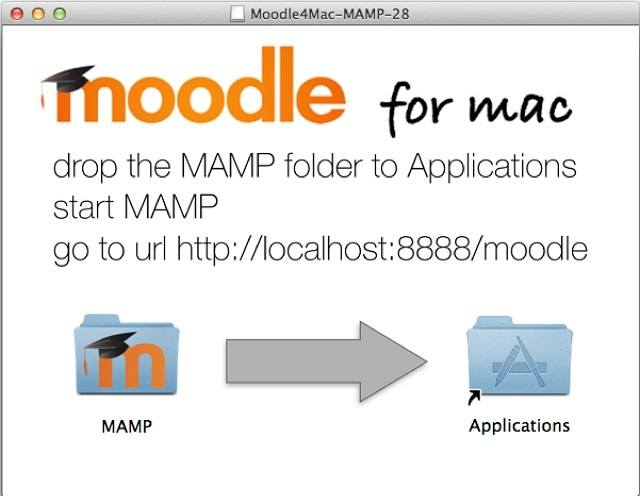
2. Double click on your recent download, ‘Moodle4Mac0MAMP.dmg’ to open up the installation disk.
3. Move MAMP into Applications as instructed on the screenshot below. Once the file has successfully moved to your Applications folder, you will be ready to set up your Moodle server.
Credit: Lambda Solutions
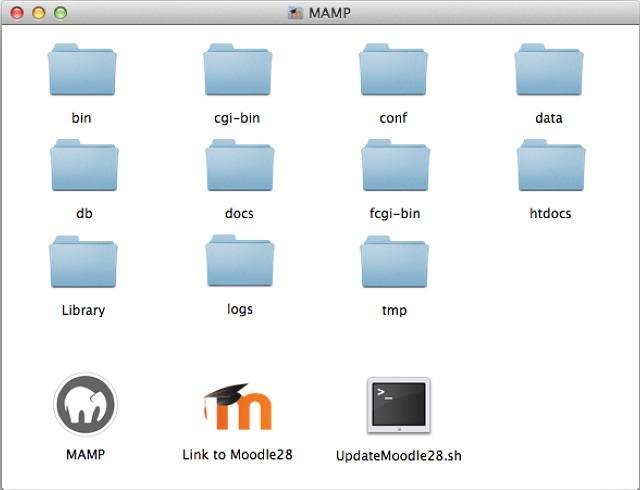
4. Navigate to your Applications folder, select the MAMP folder and double click to open
Credit: Lambda Solutions
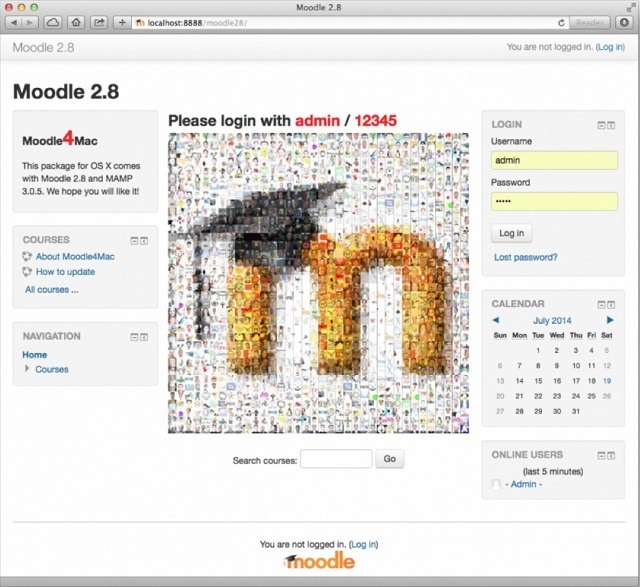
5. Open your browser and type in one of the two URLs: Either http:// localhost:8888/moodle/ or http://127.0.0.1:8888/moodle/. Your new Moodle site is now ready and running!
6. If you are going to be the main administrator of your local Moodle site, you can login with the following credentials:
- Username: admin
- Password: 12345
Credit: Lambda Solutions
You have now successfully completed your Moodle LMS installation for Mac! Next step is to find a Moodle Cloud Hosting provider to ensure your Moodle site runs optimally for speed, precision, and security.