

Ways To Convert PowerPoint Into An Interactive eLearning Module
Knowledge and time are the 2 most valuable resources in the world that we currently live in and, now, we have many opportunities to benefit from learning quickly and easily with the help of eLearning technologies. Moreover, almost everyone who has something to share with the public can become a guide in the world of knowledge, whether their strength is math, psychology, computer science, business strategy, photography, cooking, knitting, or anything else one can imagine.
Of course, there are probably a lot of people who would want to share their knowledge but have no idea how or where to start. In this article, I would like to present the steps you can easily follow in order to build your first eLearning course using PowerPoint and authoring tools.
This article will be helpful for people who are going to launch an eLearning website or use an LMS platform and need to prepare content for it. Though I understand that there is no one-size-fits-all solution, and each project will likely have their own peculiarities, I will only propose some of the possibilities and give some tips that I uncovered during my research that will be most valuable for everyone.
What's the Best Learning Management System?
In this article, we will find the answer to the questions:
- How do you create an interactive PowerPoint eLearning module (in steps)?
- Why is PowerPoint not enough for an eLearning course?
- Which authoring tool should you choose?
- What key takeaways did I get from working with the iSpring authoring tool?
Steps To Create An eLearning Module
It is a common practice that any course should be divided into modules dedicated to a certain theme. On completion of each module, students may either proceed to the next module, obtain a certificate, or take part in some type of activity, to sum up, what they learned (pass a quiz, write an essay, complete a peer-to-peer check, etc.).
On the practical side, each module can be made of one PowerPoint presentation. I will show how to make them interactive to stimulate the students' interests.
So, let's start creating your new eLearning course together!
Step 1: Preparation
To create an interactive training PowerPoint course, you will only need PowerPoint, which usually comes in the basic MS Office package, and one authoring tool (they will be discussed later on). PowerPoint is really powerful and almost an all-in-one solution that opens numerous opportunities for you, as a course creator. It allows you to transform a boring slideshow watching into an interactive and effective process.
Have All Learning Materials Prepared
Before you start creating a module, you should have all necessary materials prepared, including:
- A scenario of the module
- Text for each slide
- Audio records for each slide
- Programming instructions for animations (the consequence, the slide objects' appearance)
- Images (and even their parts saved as separate files if needed for animation)
- Video records
- Downloadable resources (documents, eBooks, presentations, etc.)
Create A Presentation
It is always easier when you have a plan in front of you. Before you move to animation, create a static slideshow where all slides with texts and images are structured in a logical order. This will be a preview of your course.
You may add programming instructions in "Notes" (View - Notes) to every slide to escape the mess.
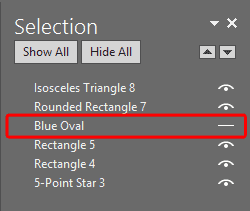
Tip: For a more precise selection of objects on a slide, open the "Selection Pane" (Home - Select - Selection Pane) where all slide objects are listed and can be renamed, brought forward or backward, grouped, made hidden or visible. This tool helped me many times with slides that contained a lot of objects.
Step 2: Animation
This is where the magic starts. When all slides, images, audio records, and programming instructions are ready, it's time to turn Galatea from a breathless statue and make it come to life. Here is what you can do:
Work With Audio
- Drag and drop your audio file to the slide. You can use any of the supported formats: MP3, WMA, or WAV.
- Click on the sound icon, and then the "Playback" tab in the tool panel to edit audio settings. Don't forget to uncheck the "Play Across Slides" and "Loop Until Stopped" checkboxes if you do not want the sound overlapping all slides.
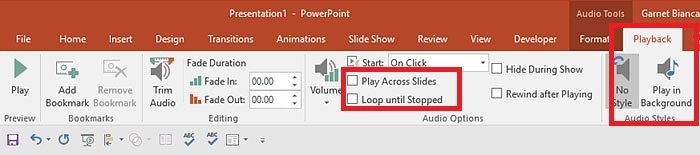
- Move the sound icon out of the slide area or check "Hide During Show" to make it invisible in the published version.
- The sound icon has a slider and timer so that you can synchronize the audio to the animations (we'll talk about how to do this next).
Add Animations
Some elements of your presentation should move for better visualization of the explained material. To make them act as you want, you can use the "Animations" tab to select from about 200 effects: Appear, Fade, Float In, etc.
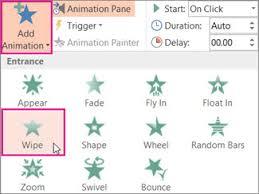
- Open the "Animation Pane" to see all objects that are animated.
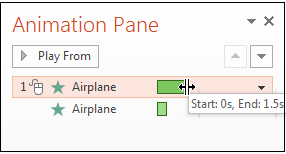
- You can select how the animation should start: "On Click" of the mouse, "With Previous" (on the slide start or with the audio or previous animation), "After Previous" (as the last animation or audio stops).
- The "Duration" is how long the animation will last.
- If you need to show an object in a definite time moment (for example, as the lecturer names it in the audio), select "With Previous" and set the time in seconds in the "Delay" field (the time can be taken from the sound icon slider).
Tip: In some versions of PowerPoint, the delay time is limited to 59 seconds. But if you need to set it for more than a minute, you'll need to find the icon next to the object listed in the "Animation Pane" and drag it to the right until you reach the preferred time for both "Start" and "End".
If you need the object to first appear and then disappear, you can link 2 animations (from the "Entrance" and "Exit" lists) to it, selecting the time delay for each.
Global Tip: Take a look at how it works on the slide preview by clicking Shift+F5 combo!
Create Pop-Ups
Often educational materials may include some explanations, glossary, citations, comments, and references. If you need to show an explanation for a term or the whole slide, but do not want to have it too cluttered or messy, you can create a pop-up over your slide. The pop-up can be opened and closed whenever it is needed like on every live website.
There are several variants for how this can be done. Let's take a look at one of them with the help of the Trigger tool.
- On top of the slide, create a new rectangle (or another shape). Put it forward on top of all other elements of the slide (just move it to the top in the "Selection Pane").
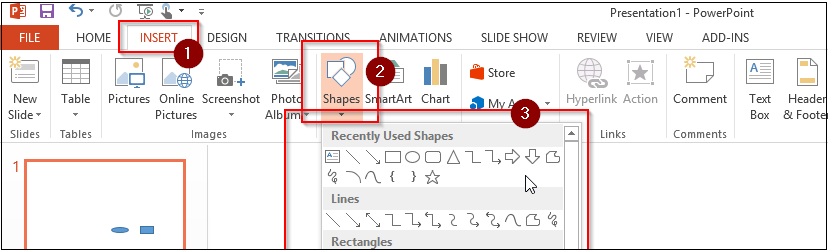
- You can edit the style of this pop-up, add some text or images to it, and the "Close" button (select X from Insert - Icons).
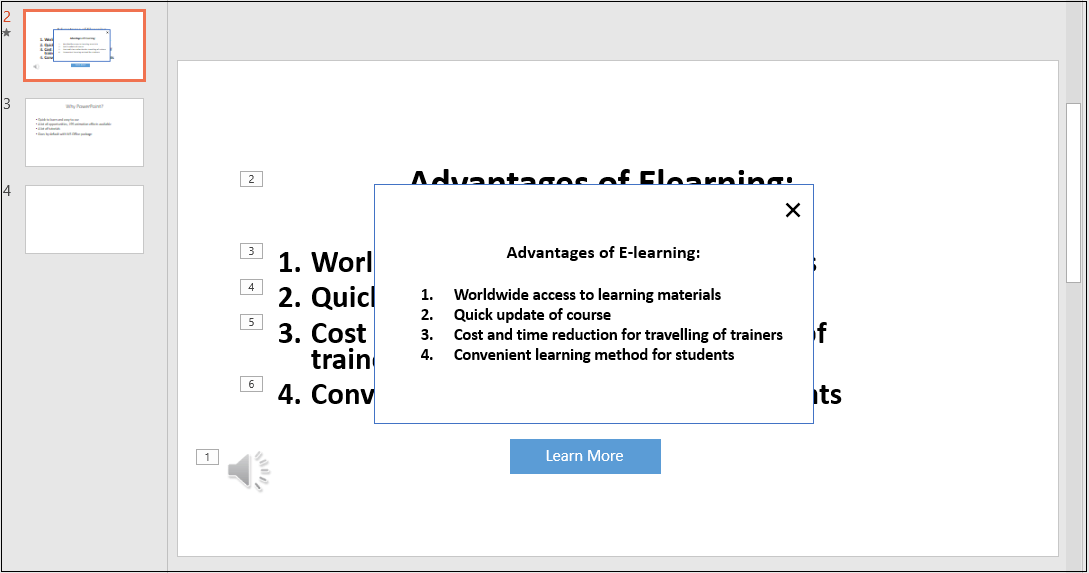
- Define the object that will be a trigger for a pop-up opening. For example, it can be a button like "Learn More" (as shown above).
Tip: As a commodity, you may group the pop-up objects (Home - Arrange - Group) and temporarily hide them (using the "eye" icon in the "Selection Pane").
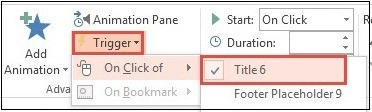
- To make the pop-up open during the presentation:
- Select the pop-up group and add one of the Entrance animations to it.
- Set "Start: On click".
- In the "Trigger" drop-down, select the element name that will open the pop-up.
- Add a closing action:
- Add an Exit animation to the pop-up group, selecting a trigger that is meant for this (in our case, this is the "x" icon, as shown above).
Tip: As you finish, don't forget to make all objects of the slide visible again (the "-" icon or "Show All" in the "Selection Pane"), otherwise nothing will work.
Disclaimer: This is just one of the possible ways to create a pop-up, and you may find a simpler one with your own research.
Navigation Among Slides
Instead of creating pop-ups for big explanations, you can solve the problem by using hyperlinks to redirect the user to another slide.
For this, select the slide object (button, icon, word, image), go to Insert - Hyperlink - Place in This Document. Select the address slide and click OK. You will also be able to hide these slides from the presentation to make them appear only by clicking.

Step 3: Publishing
It is usually not enough to just save your .ptt file and claim that the module is ready for distribution. The next obvious step is to upload it to your website or LMS platform to give people a chance to access it easily.
Why PPT Is Not Enough For eLearning
PowerPoint is a great presentation tool, familiar to almost every PC user from school age. It is intuitive to learn and provides lots of possibilities to build an online course. So, there is no reason to learn a new tool unless you need some specific features. However, there are at least 3 reasons why it is not enough for eLearning:
- It is difficult to distribute heavy .ppt files among a big number of learners.
- If you convert a presentation into a video, you risk losing all the interactivities.
- Presentations are not adapted for smartphones and iPads.
Let's see how we can solve these challenges!
1. Distribute Via LMS Or A Website
When the course is ready, it needs to be published somewhere so that students can reach it. This can be problematic with the PowerPoint slideshow. First, because most people now watch videos on the go (on the subway or during lunch) and nobody downloads a course to their mobile device.
As an example, one module of 45 slides cramped with animations and audio files can weigh up to 100MB when saved as .ppt. This is why universities and educational centers that provide remote training, upload all content on LMS platforms or their own websites so that authorized users can watch the courses online.
Speaking about company websites, with some development efforts, it is possible not only to embed the course into the website but also to add custom features like granting certificates, scoring, learning progress, printing additional materials, scheduling the course in calendars, creating user profiles, taking payment, communicating with students via forums, social media, chatbots, etc.
2. Convert To SCORM
Some people convert the .ppt files into the video to make them easier to deliver. But, doing this, you lose all interactivities.
Thus, to publish your presentation with animations, you need to convert it to an LMS compatible format, for example, SCORM, AICC, or Tin Can API.
This will allow for numerous advantages like:
- Uploading to most of the LMS systems, or embedding to your website.
- Saving all interactivities added to the presentation.
- Adding quizzes, surveys, tests after the same unit.
- Regulating the time it takes users to pass the module.
- Disabling the possibility to switch to the next step without passing over the previous one, etc.
To convert PowerPoint to an eLearning module adaptable with SCORM (AICC, Tin Can) standards, you will need to use an authoring tool (a special software to create online training modules).
3. Save As HTML5, Flash Or Both
One more challenge of creating a course relates to making it run on all devices and browsers - something eLearning PowerPoint presentations will not do. In this case, the authoring tools will come in handy. You will be able to save your presentation in HTML5, Flash, or a bundle of both of them.
You can easily embed a Flash file into a web page so your student will not be forced to download it on their devices. A Flash file plays in any web browser with the Flash plugin installed (but it looks like the era of Flash will come to an end by 2020, as announced by Adobe).
Flash presentations cannot run on iPads or Android tablets. For such devices, you can convert HTML5 format supported by most mobile platforms. Besides, all text in the HTML5 presentation will be indexed by search engines, which is great for SEO.
Having a combination of these technologies will make your content playback on all desktop, mobile, and tablet devices, as well as any browsers.
Which Authoring Tool To Choose?
Authoring tools allow you to reduce up to 25% of the time spent on course creation, and this may grow up to 80% when there is some interactivity in the course.
There are a lot of authoring tools that differ in price and features. Here are some of them:
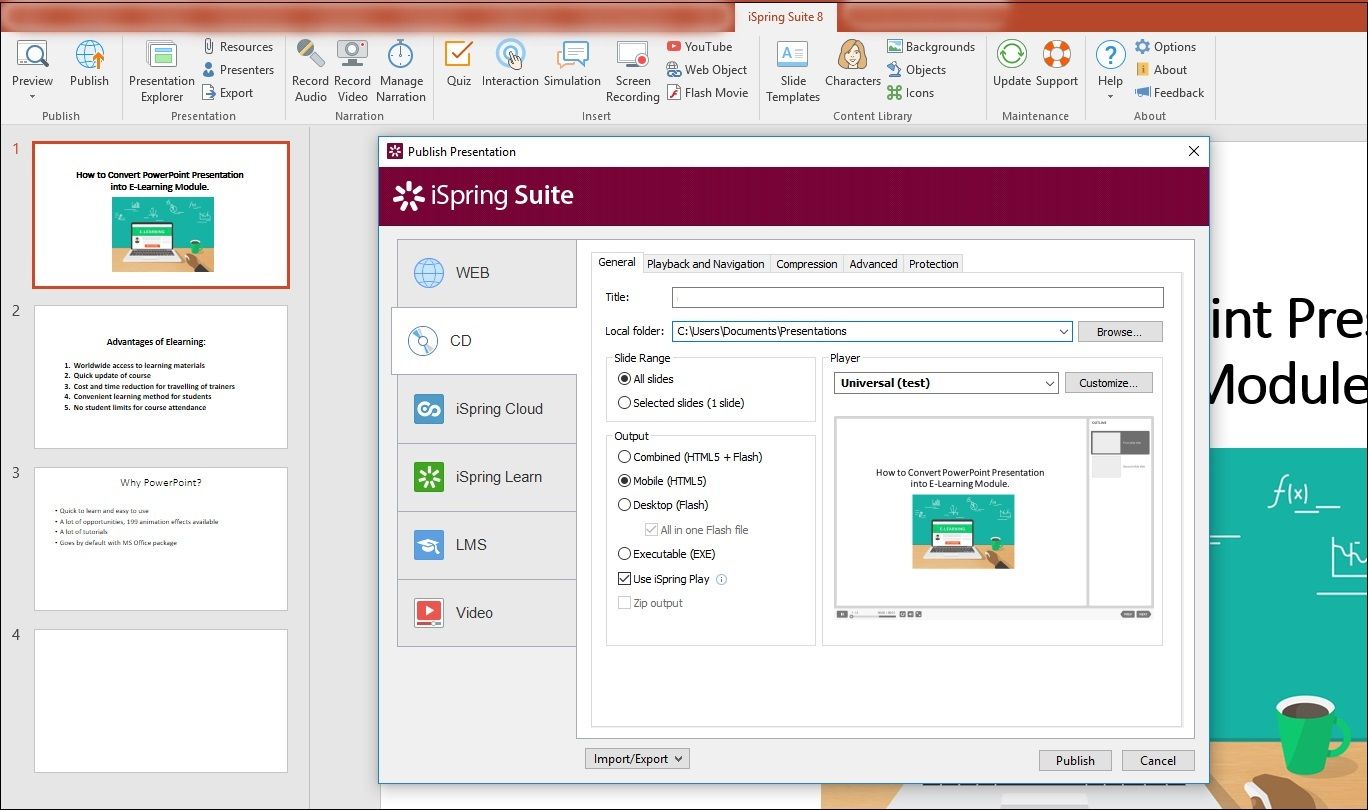
iSpring Authoring Tool
For the project that I worked on, we used iSpring Suite, a feature-rich, intuitive in usage and affordable in price authoring software. After installation, the tool gets in-built into the PowerPoint instrument panel, and you can seamlessly convert your presentation after it is done.
Among the many useful features of iSpring, I'd like to highlight:
- Converting to HTML, Flash, and HTML+Flesh without losing quality.
- Compliance with SCORM.
- Possibility to easily add quizzes, surveys, and other activities to the same module.
- Possibility to disable scrolling of the presentation to force a student to watch all slides in chronological sequence before passing to the next module.
- Customization of UI (color palette, change the layout, add/remove/rename controls).
- Adding attachments (like glossary, presentation, additional learning materials to be downloaded).
- Enabling zooming with gestures (for mobile devices).
- Quick adding a watermark.
- Possibility to save settings as templates (for testing and live environment).
This is what I wanted to share in terms of conversion of PowerPoint presentations into eLearning modules.
Key Takeaways
Hopefully, this article gave you an understanding of how to create an eLearning module for a big audience.
To create a fully functional eLearning course, it is enough to make a presentation with PowerPoint, and then convert it with one of the authoring tools. This combination gives great results, as it saves a plenty of time for the creation of interactive modules and does not require any coding skills.
With PowerPoint, you can add animations, synchronize them with audio, add pop-ups and buttons for navigation among slides, and other features. The authoring tool will make the presentation work in browsers and on all types of desktop and mobile devices.
Such presentations can be uploaded to any LMS, social media, or directly to your own website.