How To Rapidly Develop a Storyboard with Snagit
Inserting visuals into a storyboard, normally a boring manual task, can be streamlined with this process. You will learn how to move screen captures and pictures quickly and reliably into the storyboard document, eliminating the manual repetition of copy, paste, resize, and repeat. And if you need to link your visuals instead of embedding them, there's an easy way to do that, too.
Every time I do a storyboard for an e-learning project, I spend a lot of time in the “Visuals” column, defining what the finished project will look like. Since I started in the Instructional Design field as a writer, it has always been easy for me to get the outline and words right.
So, how could I make it easier to get the visuals right as well?
I’ve always respected the fine products from TechSmith, both Snagit and Camtasia Studio. And when screenshots are needed, I rely on Snagit. That’s simple and many designers do so routinely, taking screenshots from their computer screen and dropping them into the storyboard.
Recent Snagit releases have helped the tool evolve into an image management tool as well as a screen snapper. So I propose a new workflow for handling images in storyboards. It will dramatically speed your design time.
First, determine what types of images you need in your storyboard. I typically use:
- Screenshots from any software I am teaching
- Layouts of slides to be built in the development tool
- “Comps” and screenshots from web images as visual placeholders, and
- Perhaps hand-drawn sketches of layouts, scenes or artwork
Did you know you can manage all of these visuals very efficiently in Snagit? The following sections describe an automation technique in your workflow to speed things along.
Screenshots, Layouts and Comps
Here is a way to automate the process of loading screenshots, layout images and photo comps into your storyboard using Snagit 12. The automation features were added in recent Snagit releases, available for purchase or evaluation at http://www.techsmith.com. If you have any problems in the steps that follow, the Snagit help system and tutorials cover these features in depth.
- In Snagit Editor, add the Output Accessory for Word or PowerPoint , whichever tool you use for storyboards. Use the download feature to get new accessories (Share > Accessories Manager).
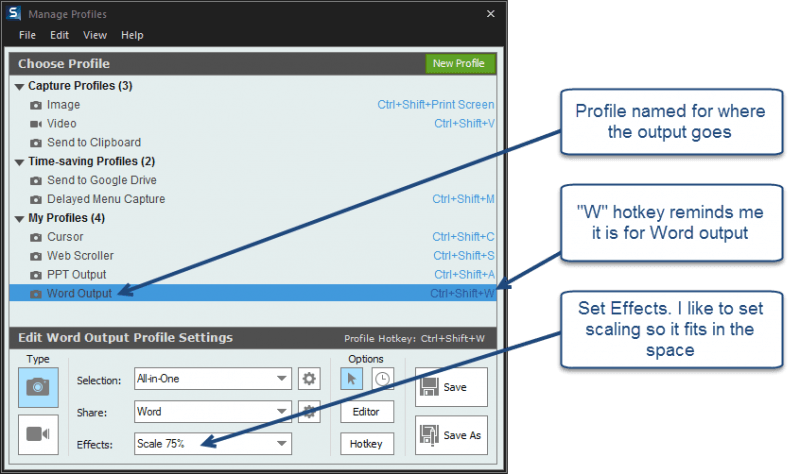
- In Snagit, add a new capture profile for the output accessory. Below is what mine looks like.
 Disable the Editor option to send the capture to the selected output immediately after capture.
- Open your storyboard file and put the cursor where the first screenshot will go.
- Following your outline, go through the software application, presentation or comp images and use your selected profile hotkeys to capture scenes (I use Ctrl + Shift + W for this profile).
- The screenshots automatically load into your storyboard as soon as you snap them! What could be easier?
Mobile Photos
Here’s a brave thought. If you need a sketch or picture in your storyboard, snap a photo with your mobile device. Most mobile phones do a pretty good job of capturing a sketch or drawing. And they are good at taking pictures. Both of these would be useful in your storyboard. Snagit and the TechSmith Fuse app make it easy to drop these images into your storyboard in a few quick steps. Don’t bother to email or message them out from the mobile device to the computer where you are writing the storyboard; Fuse handles the transfer for you. Once the image is in Snagit, it’s easy to send it to the storyboard.
- Install TechSmith Fuse on your mobile device (iOS or Android). See the information and tutorial video at http://www.techsmith.com/fuse.html.
- Using the Fuse App, take pictures of the scenes or sketches you want in the storyboard.
- Send them to Snagit directly from Fuse. You’ll need to have your mobile and the computer on the same network. Fuse guides you through the process.
- When you see the image on screen in Snagit Editor, click Sharing > Output Accessories > Word or PowerPoint.
- Voila! It goes right in the storyboard wherever the cursor resides.
Repeat the process to grab them all.
Accessory Options
For all types of captures processed through the Snagit Accessories, you have options for how they are handled. For example, if your Microsoft Word storyboard is already big and you want to link the images instead of embedding them, select the down-arrow menu below the accessory button. Click Options and check the Link to file option. You’ll get a Save as dialog to allow you to name it and save it before going to Word. The image and document remain linked as long as you don’t disturb folders or filenames. Better still, your Word final document file size will be much smaller.


