


How Adobe Captivate Helps You Design For Visual And Hearing-Impaired Learners
Commonly, accessibility is laxly expended to mean availability, opportunity, or openness, for example, access to education or scholarships.
However, in the eLearning arena, accessibility strictly refers to learning materials which are available to all kinds of learners irrespective of their abilities. The law prohibits from depriving any learners because of their disability. In the USA, the American with Disabilities Act (ADA) and Section 508 of the Rehabilitation Act delineates stringent guidelines mandating institutions such as federal agencies, higher education institutions, and any organization or corporation who does business with these agencies or organizations to make their digital materials accessibility standards compliant. Failure to adhere to these rules exposes the institution to a vulnerable situation, where they can be legally charged to pay severe penalties.
The use of screen readers, a form of assistive technology to aid visually impaired or blind in reading materials onscreen is hugely prevalent. The function of the screen reader is to convert text-based documents into other forms of communication such as text-to-speech, sounds icons, and Braille device. The 2 most prevalent screen readers are Jobs Access with Words (JAWS) and VoiceOver.
The JAWS program operates on the Microsoft Windows platform. The VoiceOver program is a built-in screen reader on a MAC operating system. The ADA and section 508 requirements are extensive covering them all is outside the purview of this article.
In this article, I focus on leveraging Adobe Captivate functionalities to design accessible eLearning courses for visually challenged learners through the use of screen readers. Below are the 5 fundamental accessibility features that can be programmed in the Captivate to be accessibility complaint.
1. Naming And Describing
Individuals who are blind or partially impaired rely on screen readers to navigate through the onscreen content. For this purpose, the following are some of the components to consider in Adobe Captivate.
Project Name And Description
A designer can locate this feature in the preference section of Adobe Captivate within the project block. Once the project loads on the web, the screen reader will recite the course title and a detailed project description.
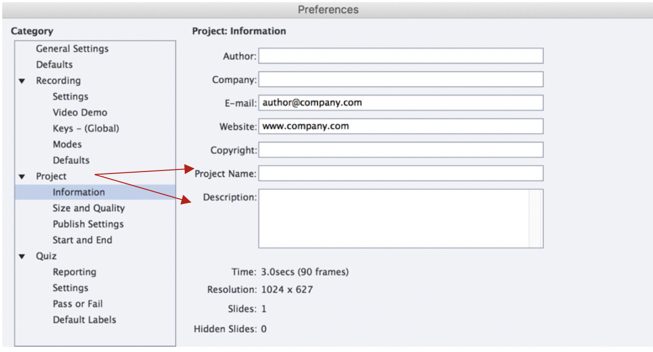
Figure 1. Adding Project Name and Description
Slides Title
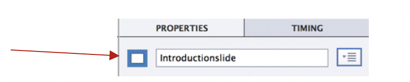
Figure 2. Adding Slide Title
This is the most straightforward way of ensuring accessibility, though it might be a bit monotonous to implement because every slide should be manually labeled. Which is to say, if you have 100 slides, each slide should be individually named. It is recommended to provide a distinctive and clear slide name for the learners to have a wholesome grasp of the learning materials.
Alternate Text Image Description
It is imperative to label each image with a unique name to meet the accessibility standard such that learners can obtain a descriptive information of the image. To add alternate text, select an image, click the icon next to the image name box, and select accessibility, this will open up a dialogue box for you to insert an image description. The screen reader will read the auto label setting as "an image."
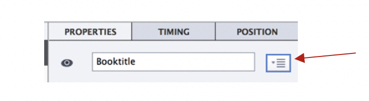
Figure 3. Adding Image Title
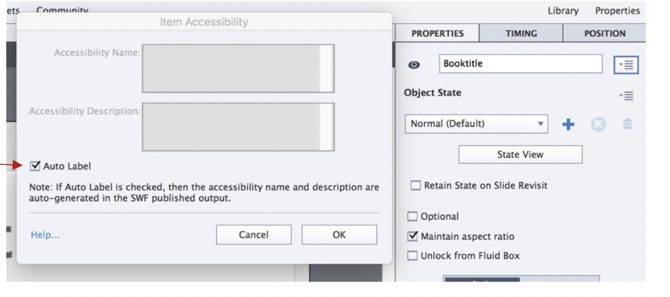
Figure 4. Unchecking Auto Label to add unique image name and description
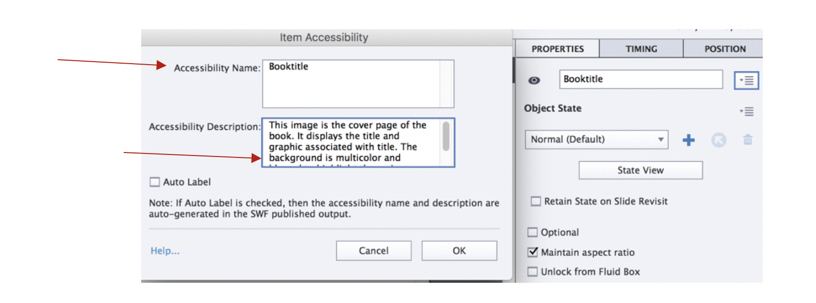
Figure 5. Adding customized image name and description
2. Adding Tab Order
In Adobe Captivate, the interactive objects are buttons, smart shapes or learning interactions. The screen reader will read the name labels of interactive objects in the order listed inside the tab order. To organize the tab order, click the icon in the properties panel next to the slide name. A dialogue box will open to allow you to arrange the order of the objects of a slide.
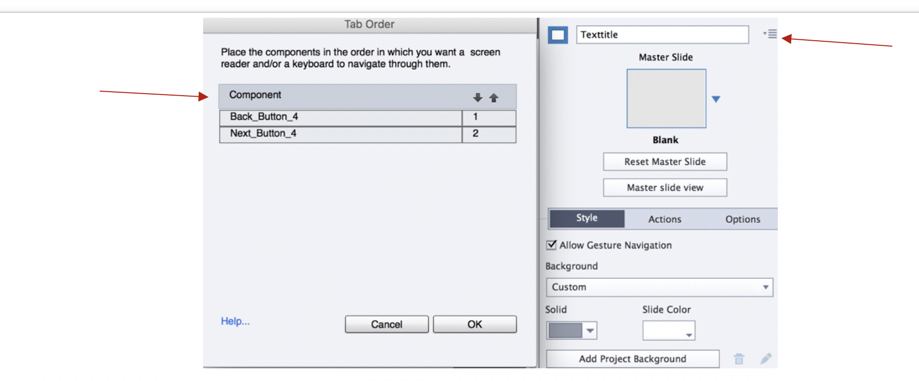
Figure 6. Organizing tab order for interactive objects
3. Creating Closed Captioning For Audio Narration
For hearing-impaired learners, the accessibility complaint standard requires closed captioning for parts consisting of audio narration. If you are using the screen recording functionality from within Adobe Captivate, it allows inserting closed captioning. You can copy and paste textual narrative from a document, or you can manually type into the dialogue box. The yellow play head depicted in Figure 7 can slide to set the start time of a closed caption to appear on the screen. The gear icon in the middle right side corner allows editing text appearance. Moving the play head to add the next start point for a new caption automatically determines the end time of the previous caption. The following necessary step (see Figure 7) is to check the closed captioning option from within the skin editor’s menu inside the themes tab, which is not selected by default.
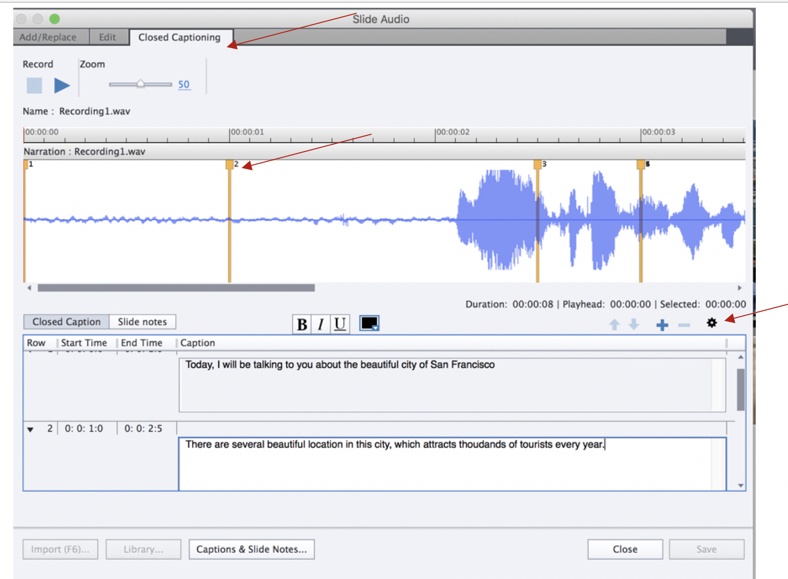
Figure 7. Dialogue box to insert closed captioning
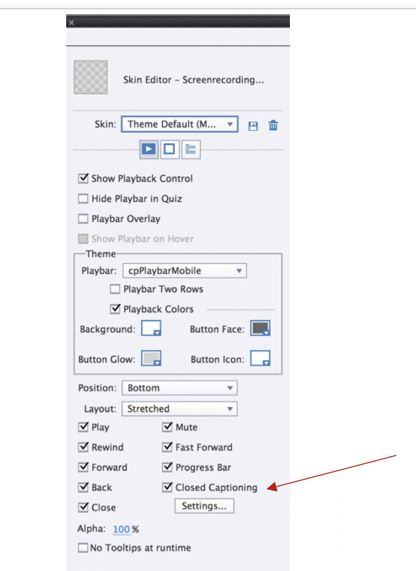
Figure 8. Checking Closed Captioning in the Skin Editor’s Menu
4. Integrating Keyboard Shortcuts
The visually challenged or blind learners use a keyboard for navigation as they may be unable to locate the exact position of clicks on the mouse. Therefore, integrating keyboard shortcuts for clickable content is a requirement to comply with accessibility standards. In Adobe Captivate, designers can add keyboard shortcuts to interactive objects such as buttons or click boxes. To add different keyboard shortcuts, select the object and in the properties panel within the action block select the radio button next to the empty box to enter a shortcut. Alternatively, you can choose from 2 quick shortcuts Ctrl or Shift. Adhering to the keyboard navigability standard comes with a caveat. The Adobe Captivate project produces the digital content in the HTML or SWF format. Many internet browsers use keyboard shortcuts and using those same common shortcuts within Captivate can confuse the browser. Therefore, it is recommended to avoid using keyboard shortcuts commonly used for an internet browser. Here is the link to view most frequently used shortcuts.
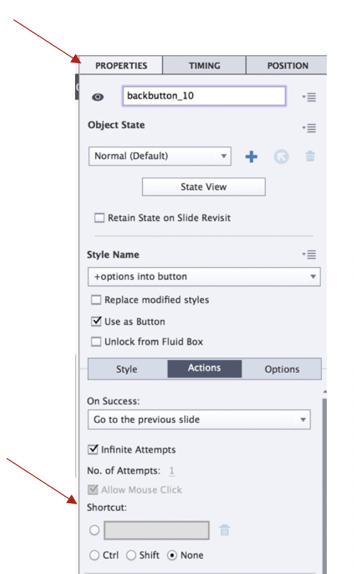
Figure 9. Checking the Radio Button to Allow Keyboard Controls
5. Activating The Accessibility Features
Following the above steps may still not create a Captivate course, which is operationally accessible unless you take this final step. Check the "enable accessibility" box in the project section. It is worthwhile to check if this box is checked to ensure the accessibility feature is on.
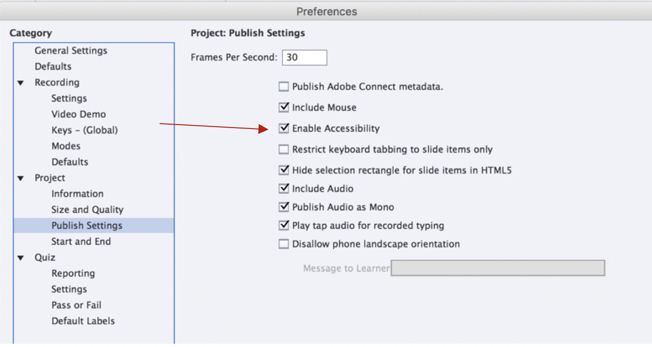
Figure 10. Enable Accessibility Box in the Preference Dialogue box