Storyboarding: 5 Best Practices
In part 1 of the article Storyboarding: A Simple Way To Get Professional In Course Authoring we took a look at storyboards, their purpose, and the best ways to start working with them.
Creating a storyboard makes working on a course significantly easier, and enables you to identify weak spots in your course and fix them on the fly. And like in any other human endeavor, there are many nuances and tricks to creating storyboards, and knowing them can save you a lot of time and effort. As you have probably guessed, this is what the second part of the article will be about; bringing people who have never created a storyboard in their life up to speed. No need to make the same mistakes thousands of eLearning pros have already learned from before you, right? Lucky for you, they are a pretty cool bunch, and are ready to share.
1. Determine your storyboard’s target audience.
Who will see it, and who will be reviewing it? Take this into account when creating the storyboard content, text, and descriptions. Target audience also dictates how thorough you need to make them, what kind of illustrations will be required, and also how deep you will need to go when presenting the course material. Target audience can be, for example, college graduates, software engineers, students, or subject matter experts. Or maybe it will be just you alone, if you plan to use the storyboard purely as a blueprint for your course.
If you are preparing a storyboard for software engineers, it will likely include a lot of technical details. On the other hand, if no one besides you will see it, a basic outline will suffice, as long as you are able to recall what it was that you planned to do on each marked slide.
2. What information to include on every screen?
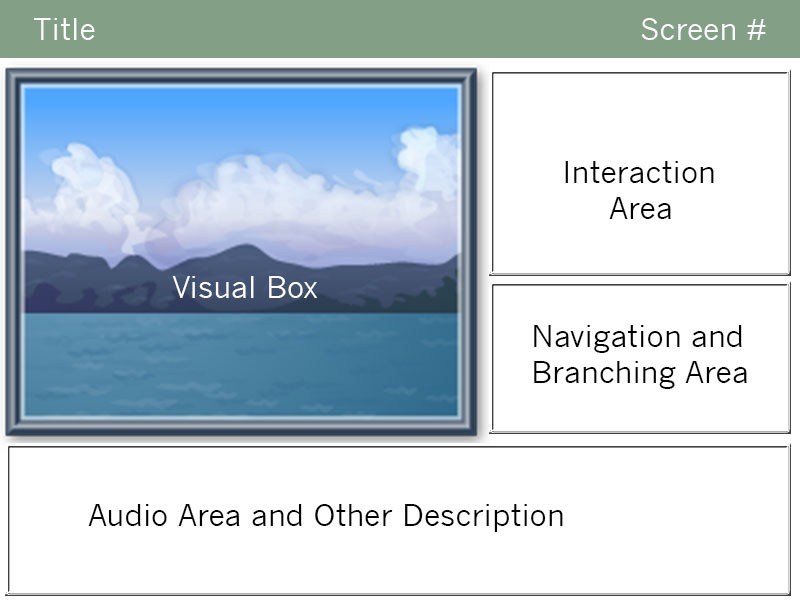
The structure of your pages depends on a number of factors: how much time are you prepared to dedicate to your storyboard, how detailed a blueprint do you need, and who will be reviewing it. If you are pressed for time, or are unwilling to expend a lot of effort on storyboard creation, limit every screen to the title, screen number, and a schematic drawing of the page. If, however, you are the kind of person that likes to describe everything in meticulous detail and you have time to spare, your storyboard may look a little like this:
Your storyboard may contain detailed descriptions of every page, including information about interactive components, details regarding navigation, transitions to other pages, and sound. Go one way or the other, or find some middle ground that works best for you; it all depends on your needs and on how much time you are willing to spend.
3. Pick a tool that will enable you to change the storyboard plan with ease.
Creating a blueprint for a course is quite a dynamic process. Most likely, you will need to change the order of pages within the course and add new pages between existing ones, thus changing the storyboard structure. This makes using a tool that enables you to mix up the structure of your storyboard and the order of pages within it very much preferable. An erasable pencil will do, but a web service allowing you to drag and drop pages within the course is even better.
4. Don’t be afraid to change or delete already existing storyboard pages.
It takes a genius to think up a scenario from start to finish and not make a single mistake. More likely than not, you will start doubting your storyboard layout during creation, and your doubts will grow stronger while working on the pages themselves. Should you come to the realization that half of your page sketches are best scrapped and redone from scratch, take heart: This is just preliminary planning, not a manned mission to Mars. On the contrary, by noticing and correcting your original mistakes you demonstrate a greater insight into the nature of your course gained through the creation of the storyboard. This would not have been possible without the handy and versatile tool that helped you improve your course; the storyboard.
5. Pay attention to nonlinear courses.
Since the structure of a nonlinear course and the relations between its pages is not always easy to describe with words, consider using more visual means that will enable you to demonstrate the nonlinear connections within the course without confusing those who will see your storyboard. There are online services that can help you, such as course authoring aids giving the ability to see the course skeleton, but a sheet of paper and a pencil will work in a pinch. You can also use PowerPoint or a simple graphics editor.
When working on a nonlinear course, it always pays to provide a detailed description of all possible transitions; what page the learner will be redirected to after encountering the nonlinear portion of the course, and under what circumstances.
When to Avoid Using Storyboards
Depending on how detailed a blueprint you want, storyboarding can be quite time consuming. Creating a visualized storyboard, complete with thorough descriptions and detailed mockups of pages, can take quite a lot of time. So before starting, you should ask yourself: “Is this worth it?” The answer to that question can be “No”. Here are a few situations where you may want to avoid using storyboards:
- Storyboarding may not be for you if you prefer to rely on the trusty “paper and pencil” method and are constantly having a change of heart about the course structure. Constantly erasing half of what you have sketched and starting over will get tedious soon.
- If you are the only person within your organization tasked with the creation of eLearning courses, and do not need to share your vision and ideas with colleagues/subject matter experts/software engineers, creating storyboards may not be practical.
- Creating a comprehensive storyboard for a complicated nonlinear course can take a lot of time and effort. You may be better served by skipping the storyboarding stage and proceeding directly to the course creation, using the course authoring tool to express the transitions between the course pages.
If you are not sure whether creating a storyboard for your course is worthwhile, try limiting yourself to a basic storyboard. Sketch pages with titles only, maybe jot down a few quick lines about some key points you want to get across. Use short words and simple sentences. This will not take much time, and at the same time will give you a better understanding of the course and its main ideas, and help you get going. More often than not, preparing a storyboard will help you get your ideas in order and get the course structure just right (especially if you do not have another document detailing the course blueprint).


