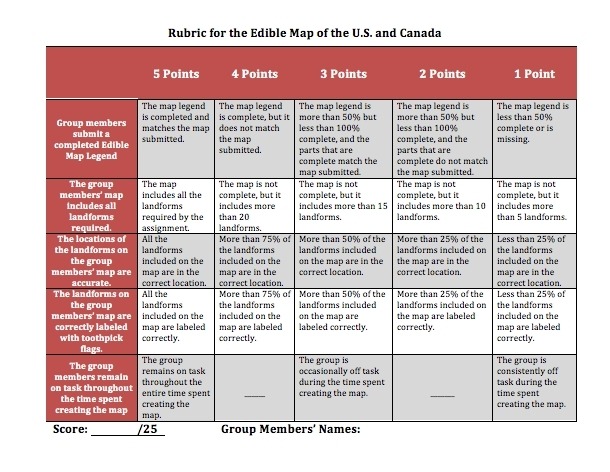

What Is A Rubric?
Rubrics are clear guidelines that educators use as criteria for assessing student performance. They evaluate students' work, including assignments, homework, and exams. Essentially, rubrics are scoring guides that break down specific components of an assignment and set clear expectations for each part.
Rubric-based assessments are most effective when students understand them thoroughly. Implementing rubrics properly involves providing students with transparency about how they will be evaluated, how they should demonstrate their understanding, what to expect from assignments and exams, and what their next steps should be.
Moreover, rubrics help clarify grading outcomes, ensuring that students are not left uncertain about why they received a particular score. In summary, the primary purpose of rubrics is to enhance student learning.
How Rubrics Help Teachers
Using rubrics for grading offers several benefits for educators, including:
Better Planning
Rubrics provide educators with a clear understanding of their students' performance and skills, enabling them to set future objectives more effectively. By facilitating transparent assessments, rubrics help educators identify patterns and customize lessons accordingly.
Objective Grading
Rubrics contribute to more objective evaluations of student performance. With clear guidelines, educators know exactly what to look for when assessing work, reducing subjectivity in grading.
Time Savings
Well-designed rubrics streamline the grading process, saving time both in the short and long term. They make it easier to measure higher-order skills, score assessments consistently (especially among teams of educators), and deliver feedback. Educators can quickly identify performance gaps and areas where students made mistakes.
Facilitating Discussions On Student Performance
Rubrics are essential when discussing a student's work with their family or other involved parties, such as fellow educators or supervisors. They provide documented evidence of a student's strengths and weaknesses in relation to assessment expectations. This clarity allows educators to express their observations more clearly, rather than resorting to vague statements. Consequently, students receive clear guidance on where they excelled and where they need improvement, helping them enhance their performance more effectively.
How To Use The 5 Best Free Rubric-Making Tools For Teachers
1. Annenberg Learner
About Annenberg Learner
Annenberg Learner is one of the best free rubric tools available for educators. It allows teachers to define the layout of their rubrics and the criteria on which students will be assessed. The service then generates a customized rubric based on these specifications.
How To Use
- Click the link above to visit the Annenberg Learner page.
- Once there, click the bold "Build a Rubric" text located in the center of the page.
- On the next page, enter the title of your rubric and your name, then click "Next."
- Choose your preferred format for the rubric—either table or list—then click "Next."
- In Step 3, select the rating system you wish to use for your rubric and click "Next."
- For Step 4, determine how you want the rating system to be displayed on your rubric and click "Next."
- On the next page, specify the criteria by which students will be graded and click "Next."
- In Step 6, decide how you would like these criteria to be presented in your rubric and click "Next."
- Your rubric is now complete! The Annenberg Learner's Build a Rubric system has generated a rubric based on your specifications. To view your completed rubric, click the "Completed Rubric" hyperlink on the Step 7 page.
2. Quick Rubric
About Quick Rubric
QuickRubric.com is a free, web-based tool designed to help educators and others create scoring rubrics quickly and easily without complicated software or templates. It focuses on simplicity, letting you build clean, modern rubrics online and then save, share, or print them for classroom use.
How To Use
- Visit QuickRubric.com and click "Create a Rubric."
- Before adding content, think about what you are assessing, like what type of work students are doing and what key skills or outcomes you should measure.
- Add rubric criteria and select how many criteria you want (3–7 is usually manageable).
- Decide how many performance tiers you want such as Excellent, Satisfactory, Needs Improvement or numerical levels like 4-Point Scale or 5-Point Scale.
- For each criterion and level, write a short description explaining what performance looks like
- Format your content by bolding or italicizing key phrases or using bulleted lists for clarity.
- Check that your rubric is clear and consistent across all performance levels. Use QuickRubric's grid preview to view the entire rubric at a glance.
- After finishing, save your rubric to your account. You can print it, copy a link to share with students, or use it digitally during assessment.
Create the best Course for your School with the Right Vendor
3. iRubric
About iRubric
iRubric is a service provided by Rcampus.com that allows users to create a rubric that they can save and edit at any time.
How To Use
- Click the link above to visit the iRubric homepage.
- Once there, locate the hyperlink that says "Get started" directly below the slideshow and click it. You will now be taken to a signup page; designate the type of account you want to create and click "Continue."
- On the next page, enter your username, email address, and password, and then move on to the next step.
- On the next page, you will enter your personal information and then click "Save."
- After completing the signup process, you will be taken to a "Quick Links" page. Once here, locate the tab to the top right of the screen that reads "Rubrics" and click it.
- Select "Build" from the dropdown menu. To create a new rubric, select "Option A: Build From Scratch" and click "Start."
- On your rubric creation page, enter the title, description, keywords, and grade level of your rubric. Then, select a primary subject and type.
- Scroll down to your rubric. In the first column, enter a title and categories on which students will be graded. In the remaining columns to the right of the screen, include the specifications for those categories. Add a level or column by clicking "Add Level or Column" to the right of the screen.
- Once you are done with your rubric, find the "This Rubric is:" heading and click "Ready to use." Under "Gallery Viewing," decide whether or not you would like to keep your rubric private or open it for public viewing.
- When you are done, click "Save." You will now be redirected to a page where you can decide if you would like to share your rubric, print it, or do a multitude of other things.
4. RubiStar
About RubiStar
RubiStar is a simple and easily customizable tool for creating rubrics.
How To Use
- Click the link above to visit the RubiStar site. Once there, scroll down to the "Create a Rubric" heading and click the blue button for the subject for which you would like to create a rubric. RubiStar will now redirect you to a page with a customizable rubric template to choose from.
- Choose the rubric template that is most similar to the assignment for which you are creating a rubric. You will now be redirected to the page where you will create your rubric.
- First, include general information for the rubric, like your name, the name of the project, the zip code in which you are teaching, and whether or not this is a demonstration rubric.
- After specifying basic rubric info, you can begin customizing your rubric under the "Creating and Editing Your Rubric" heading.
- Under the "Category" column, choose the categories on which students will be graded. In the remaining columns to the right of the "Category" column, include the specifications for student work that is below standards, approaches standards, meets standards, or is above standards; include scores if you wish.
- Once you have customized your rubric, click the "Submit" arrow at the bottom of the screen. RubiStar will now redirect you to a screen on which you can print, download, or make your rubric available online.
5. Teachnology General Rubric Generator
About Teachnology General Rubric Generator
The Teachnology General Rubric Generator is incredibly easy to use and produces a rubric with a clean look.
How To Use
- Click the link above to visit the Teachnology General Rubric Generator. Once there, locate the text boxes under "Step #1: School, Title, and Teacher Name" and enter the required information.
- Choose a picture for your rubric under "Step #2: Pick a Picture."
- In "Step #3: Body of Rubric," you will create the specifications for the assignment.
- In the text box next to the gray boxes that read "Stated Object or Performance Number," enter the category on which students will be graded. In the text boxes next to the blue boxes that read "(Beginning, Developing, Accomplished, or Mastery) Level of Performance for Objective #," add the specifications on which students will be graded.
- Once you are done editing your rubric, click "Generate Rubric" at the bottom of the page. Teachnology will now provide you with a plain text version of your rubric that you can either print or copy and paste into a document or email.
Free Educational Technology
Now that you have the 5 best free Rubric making tools for teachers, there's no reason not to utilize them in order to make grading every assignment easier!